Here at Compsoft Creative we go to great lengths to make things as easy for ourselves as possible so we can spend more of our time designing and building awesome mobile apps and less time messing around with build servers and infrastructure.
We thought we'd be super generous and share our expertise when setting up and using the following tools with fastlane:
- Xcode
- Jenkins
- iTunes Connect
- Slack
- Fabric/Crashlytics
You might not use all these, or, indeed you might use other tools in addition. Hopefully this blog will help you get fastlane set up and enjoying a life of continuous integration :)
prerequisites for this tutorial:
- Xcode project in a buildable state
- Final Bundle ID for your project, e.g. com.compsoft.fastlane
- Basic Ruby Scripting knowledge is a must!
Note, my project and it’s target are called fastlane. please replace fastlane in the schemes and Bundle IDs with your target’s name.
1 Install fastlane
First, you should install Fastlane, to do this open up the Terminal app and type:
sudo gem install fastlane
Wait for the command to complete, this should go through without an issue.
Now navigate to your project directory in Terminal,
cd ~/Documents/Company/myproject
And initialise fastlane,
fastlane init
At the prompt, select option 4. Manual Setup
Read through the instructions, we will come back to the files it created later.
2 Project Setup
Currently your project is in a virgin state, it is ready for some fastlane action, to do this we will need to create new Schemes and Configurations that will enable us to build different versions of the app pointing to different servers for Development, Testing, Staging and Production. These are key words in this process as you will find out. I recommend you use them, however you can omit and change the names if you wish. that is to say your project may not have a Staging environment, if so you can omit staging.
2.1 Adding Configurations
Click on the project file in the project file explorer on the left and select the project option in the new window, see the screenshot below. On this screen, click the plus button (circled) and duplicate Debug, rename the newly created configuration “Testing” and rename the Debug configuration “Development”. Now select Release and duplicate it too, renaming the configurations “Staging” and “Production”.
On this screen also change the configuration used for command line builds to Staging.

2.2 Adding Schemes
Now we need to add 3 new schemes to our project. Click and hold down on the scheme selector, and select manage schemes from the menu.

A new pane will slide down, this is the scheme manager, here we will add the 3 new schemes and rename the existing one fastlane Dev. , click the plus button (+) and make sure the target is your application and not a library. Name the schemes as follows:
<Target Name> Dev
<Target Name> Testing
<Target Name> Staging
<Target Name> Production

For each of the new schemes, you will need to make sure they each use the correct configurations respectively, to do this highlight the scheme and click Edit… Let’s start with “fastlane Dev” here.
For each tab on the left, set it’s Build Configuration to be “Development”, if done correctly it will look like the screenshot below.

Repeat the previous step for the other 3 steps, the build configuration needs to match the scheme name.
2.3 Bundle ID Control
Now we have our schemes and configurations set up, we now need to create appropriate Bundle IDs for each configuration. By using different Bundle IDs we can install different configurations side by side.
Let’s use the following pattern: com.company.application.environment
e.g.
- Production: com.company.fastlane
- Staging: com.company.fastlane.staging
- Development & Testing: com.company.fastlane.dev
We add these to the project by selecting our project from the project explorer pane and selecting our target from the new window, then select build settings and search for Bundle_Identifier. Expand the Product Bundle Identifier property and enter our new Bundle IDs where appropriate.

2.4 Environment Router
For every project we add an EnvironmentRouter class, this allows us to switch between different endpoints for servers automatically. Here we can also specify options and features that each configuration may display or use.
As we are still in the project build settings, from the top tool bar, click Editor, Add Build Setting, Add User-Defined Setting. Call it “ENVIRONMENT” and populate it’s values as DEVELOPMENT, TESTING, STAGING, PRODUCTION.

Below is the Environment Router class, create a new file called EnvironmentRouter.swift and copy the below into it.
//// EnvironmentRouter.swift
// fastlane
//
// Created by Myles Eynon on 21/02/2018.
// Copyright © 2018 Compsoft. All rights reserved.
//
import Foundation
open class AppEnvironment {
static open let environment = Environment()
//this class speeds up access to the environement enum so we do not have to needlessly reinitialise the class every time by reading the plist.
}
public enum Environment {
case development
case testing
case staging
case production
public init() {
let plistPath = Bundle.main.path(forResource: "Info", ofType: "plist")
let plistDict = NSDictionary(contentsOfFile: plistPath!)!
if let environmentString = plistDict["Environment"] as? String {
switch environmentString {
case "DEVELOPMENT": self = .development
case "TESTING": self = .testing
case "STAGING": self = .staging
default: self = .production
}
return
}
self = .production
}
public var name: String? {
let infoDict = Bundle.main.infoDictionary
let version = infoDict?["CFBundleShortVersionString"]
let build = infoDict?[String(kCFBundleVersionKey)]
let versionName = NSLocalizedString("version_title", value: "Version", comment: "version title")
switch self {
case .development:
return "Development \(versionName): \(version ?? "") (\(build ?? ""))"
case .testing:
return "Testing \(versionName): \(version ?? "") (\(build ?? ""))"
case .staging:
return "Staging \(versionName): \(version ?? "") (\(build ?? ""))"
default:
return "\(versionName): \(version ?? "") (\(build ?? ""))"
}
}
public func baseServiceURL() -> String {
switch self {
case .production:
return "https://production.com"
case .staging:
return "https://staging.com"
case .testing:
return "https://testing.com"
default:
return "https://dev.com"
}
}
public func isEnviroment(type: Environment) -> Bool {
if type == self {
return true
}
return false
}
public var isLive: Bool {
switch self {
case .production, .staging:
return true
default:
return false
}
}
}
In the above class set your environment properties correctly and add any other environment properties as required.
Usage: AppEnvironment.environment.baseServiceURL()
If you have read the above class, you will have noticed we use a Plist property from the project’s Info.plist file. We will add that next, in the project file explorer find Info.plist and open it. In the plist add a new entry called Environment with a type of string.
In the value field enter “${ENVIRONMENT}”
If done correctly it will look like below:

As we are in the build settings, we will want to set the compiler to produce DSYM assembly files for all configurations. This data is required by Crashlytics to highlight crashes.
In the Build settings search box, type: debug info and set the options to match the below screenshot.

Additionally to provide security against end-users modifying the environment, we want to remove the environment plist value, this is achieved in a Run build script. You can add this under the “Build Phases” tab of the project settings, add it to the end.
info_plist_path="${BUILT_PRODUCTS_DIR}/${EXECUTABLE_FOLDER_PATH}/Info.plist"
if [ $CONFIGURATION == "Production" ]
then
/usr/libexec/PlistBuddy -c "Delete :Environment" "$info_plist_path"
fi
3. Apple Provisioning
Ahh the bane of every developer! Provisioning profiles and certificates… Luckily fastlane has a tool called Match, this takes care of everything for you and your team. Once match is configured on your machine, the other developers simply need to checkout your project, install fastlane and run match.
At this point, if the customer has provided their Apple ID or invited you into their team (admin level) you will need to disable automatic provisioning on the general tab of your target, otherwise leave automatic provisioning turned on. You will need to return here and follow this section when you do get the details.
Go to: https://developer.apple.com/
Select “Account” from the top menu.
Login with the account details that are linked to this account.
On the landing page select “Certificates, Identifiers & Profiles”
Click “App IDs” from the left, then the Add button from the top right.
On the new screen enter the description for the app, this can be the name and the environment. We will need to create 3 of these in total. e.g. <App Name> Production, <App Name> Testing and <App Name>Staging.
Below this is the App ID Suffix, select Explicit and enter the associated bundle ID from before.
Production: com.compsoft.fastlane, Staging: com.compsoft.fastlane.staging, com.compsoft.fastlane.dev
Select any required capabilities from the list below and make sure you select the same capabilities for the other two.

3.1 Adding Devices
You will also need to add devices to the profile otherwise we cannot create AdHoc provisioning profiles.
Click on the “All” button under Devices, now click the plus button. You can bulk upload device UDIDs or enter them manually.
Below is the file format for bulk uploading: (use smart quotes and tabs between fields)

3.2 Certificate Repository
Once all devices are added, we will need to create a repository in Bitbucket to store our Certificates and Profiles.
Go to https://bitbucket.org/ and log in with your credentials.
Once you are logged in, click the plus button on the lefthand menu, click “Create New Repository”
A new page will load, select your account as the owner and choose or create a project that belongs your applications project.
Type a name for the repositorty e.g. “fastlane-ios-certificates” make sure the settings are the same as the screenshot below.
Click “Create repository” Copy the URL of this repository as it will be required later. e.g.
https://bitbucket.org/yourcompany/your-apps-ios-certificates

3.3 Match
https://docs.fastlane.tools/actions/match/We are now ready to run match, this is where the magic happens and developer stress levels drop.
Open finder and navigate to you project root folder, inside there should be a folder called “fastlane”. You should have a file called “Matchfile” it has no file extension. If it does not exist create it in a text editor.
Replace the contents of the Matchfile with the following, replacing the property values where appropriate.
git_url "https://bitbucket.org/your_company/your-ios-apps-ios-certificates"
type "development" # The default type, can be: appstore, adhoc, enterprise or development
app_identifier [“com.compsoft.fastlane.dev", "com.compsoft.fastlane", "com.compsoft.fastlane.staging"]
username “johnappleseed@icloud.com” # Your Apple Developer Portal username
# For all available options run `fastlane match --help`
Open up terminal and navigate to your project:
cd ~/Documents/Compsoft/…
Type:
fastlane match development
you will be prompted for the password to Apple account specified in the Matchfile and you will need to choose/create a secure password that will be used to encrypt the certificates.
Write these passwords down in a text file along with the repository url.
If you have multiple teams associated to that account, you will need to copy the Team ID next to the required team for use later. You can also find this ID in the URL of the Apple account dashboard: https://developer.apple.com/account/#/overview/YourAccountID
You can also use the below command in Terminal, replace the user and pass with your Apple ID and password.
| /Applications/Xcode.app/Contents/Applications/Application\ Loader.app/Contents/itms/bin/iTMSTransporter -m provider -u <USER> -p <PASS> -account_type itunes_connect -v off |
After that has finished, run:
fastlane match adhoc
followed by:
fastlane match appstore
Congratulations! If nothing went wrong you have successfully created and installed all the certificates needed for your app!
3.4 Setting Up Provisioning Profiles In The Project
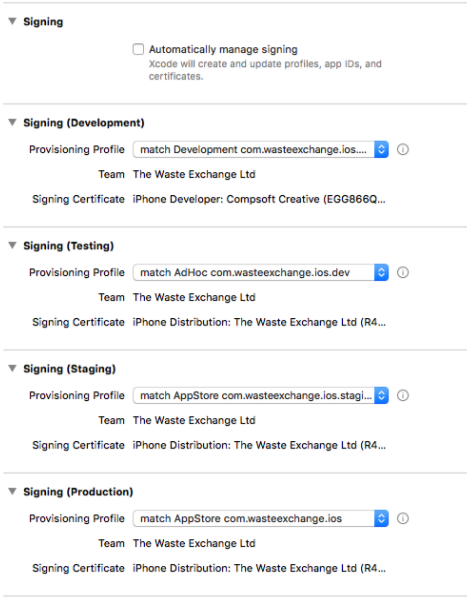
Now that the certificates and profiles have been created and installed, quit Xcode and reopen your project, this helps Xcode to refresh the list of provided certificates. On the “General” tab of the project settings, select the relevant provisioning profile for each configuration. You will know the provisioning profiles that were just created as they have a “match” prefix followed by the bundle ID. You will need to set them as follows: Development: match Development com.compsoft.fastlane.dev Testing: match AdHoc com.compsoft.fastlane.devStaging: match AppStore com.compsoft.fastlane.staging Production: match AppStore com.compsoft.fastlane
Congratulations, you project is a majority of the way to being Fastlane compatible.
4. Fastfile
Now we need to create the Fastfile. In Finder, navigate to your project root, then open the fastlane folder. If the “Fastfile” (Note no file extension) does not exist, create one in a text editor. 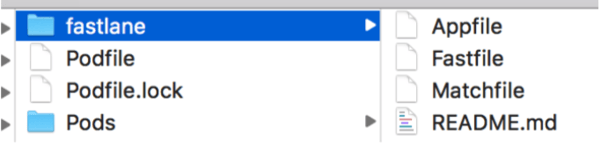
# Customise this file, documentation can be found here:
# https://github.com/fastlane/fastlane/tree/master/fastlane/docs # All available actions: https://docs.fastlane.tools/actions
# can also be listed using the `fastlane actions` command
# Change the syntax highlighting to Ruby
# All lines starting with a # are ignored when running `fastlane`
# If you want to automatically update fastlane if a new version is available: # update_fastlane
# This is the minimum version number required.
# Update this, if you use features of a newer version fastlane_version "2.33.0"
default_platform :ios
ENV["FASTLANE_XCODEBUILD_SETTINGS_TIMEOUT"] = "180" ENV["FASTLANE_XCODE_LIST_TIMEOUT"] = "180"
############################## GLOBAL VARS ##############################
$targetName = "our project"
$appBundleIdentifier = "com.ourproject.ios"
$appBundleIdentifierDev = "com.ourproject.ios.dev"
$appBundleIdentifierStaging = "com.ourproject.ios.staging"
$appleUsername = "you@yourcompany.co.uk"
$workspaceName = "Ourproject.xcworkspace"
$projectName = "Ourproject.xcodeproj"
$ipaFilename = "Ourproject.ipa"
$plistPath = "./ourproject/Resources/Info.plist"
$itcTeamId = "118923029"
$crashlyticsTesterGroups = ["ourproject-testers"]
$certificateRepoURL = "https://yourcompany@bitbucket.org/yourcompany/ourproject-ios-certificates.git"
ENV["SLACK_URL"] = "https://hooks.slack.com/services/TheURLGeneratedInCustomIntergrtionsInSlack"
############################## PRE ##############################
platform :ios do before_all do
xcode_select("/Applications/Xcode9.2.app")
unlock_keychain(
path: "~/Library/Keychains/login.keychain" )
#ensure_git_status_clean
Dir.chdir("..") do
sh "./scripts/remove_pods.sh"
end
BUILD_NUMBER = ENV["BUILD_NUMBER"]
set_info_plist_value(path: $plistPath, key: "CFBundleVersion", value: "#{BUILD_NUMBER}")
cocoapods(
clean: true )
end
#desc "Runs all the tests" #lane :test do
# scan
#end
######################### PUBLIC LANES ##########################
lane :testing do fabric(scheme: "Testing")
end
lane :staging do itc(scheme: "Staging")
end
lane :production do itc(scheme: "Production")
end
#------------------------- Crashlytics -------------------------#
private_lane :fabric do |options| scheme = options[:scheme]
build(
scheme: scheme )
environment = scheme.upcase
crashlytics(
api_token: "yourapitoken", build_secret:
"yourbuildsecret", ipa_path: $ipaFilename,
notes: "Running on #{environment}",
groups: $crashlyticsTesterGroups
)
post_to_slack(scheme: scheme, destination: "Crashlytics") end
#--------------------------- App Store -------------------------#
private_lane :itc do |options| scheme = options[:scheme] build(
scheme: scheme )
pilot(
ipa: $ipaFilename,
team_id: $itcTeamId,
skip_submission: true, skip_waiting_for_build_processing: true
)
#deliver(force: true)
post_to_slack(scheme: scheme, destination: "TestFlight")
end
############################# UTIL ##############################
private_lane :build do |options| scheme = options[:scheme]
#register_devices(username: $appleUsername, # devices_file: "./fastlane/devices.txt" #)
if scheme == "Testing"
match(git_url: $certificateRepoURL,
username: $appleUsername,
type: "adhoc",
app_identifier: $appBundleIdentifierDev
)
elsif scheme == "Staging"
match(git_url: $certificateRepoURL, username: $appleUsername,
type: "appstore",
app_identifier: $appBundleIdentifierStaging
) else
match(git_url: $certificateRepoURL, username: $appleUsername,
type: "appstore",
app_identifier: $appBundleIdentifier
) end
method = "app-store" if scheme == "Testing" method = "ad-hoc"
end
gym(
export_method: method,
scheme: "#{$targetName} #{scheme}",
configuration: scheme,
clean: true,
include_bitcode: true,
workspace: $workspaceName,
output_name: $ipaFilename,
xcargs: "ARCHIVE=YES" # Used to tell the Fabric run script to upload dSYM file
) end
private_lane :post_to_slack do |options|
scheme
version
build
environment = scheme.upcase destination = options[:destination]
slack(
= options[:scheme]
= get_version_number(xcodeproj: $projectName)
= get_build_number(xcodeproj: $projectName)
message: "New :ios: *#{version}* (#{BUILD_NUMBER}) running `#{environment}` has been submitted to *#{destination}* :rocket:",
)
desc "New :ios: *#{version}* (#{build}) running `#{environment}` has been submitted to *#{destination}* :rocket:"
end
############################# POST ############################## after_all do |lane|
# This block is called, only if the executed lane was successful
#slack(
# message: "Successfully deployed new App Update." #)
end
error do |lane, exception|
#slack(
# message: exception.message, # success: false
#)
end end
# More information about multiple platforms in fastlane: https://github.com/fastlane/fastlane/blob/ master/fastlane/docs/Platforms.md
# All available actions: https://docs.fastlane.tools/actions
# fastlane reports which actions are used. No personal data is recorded. # Learn more at https://github.com/fastlane/fastlane#metrics
4.1 Notes about the above fast file
If you have Automatic provisioning enabled, delete the following section from the Fastfile: Also Look at ITC Team ID below.match(git_url: $certificateRepoURL,
username: $appleUsername,
type: "adhoc",
app_identifier: $appBundleIdentifierDev
)
elsif scheme == "Staging"
match(git_url: $certificateRepoURL, username: $appleUsername,
type: "appstore",
app_identifier: $appBundleIdentifierStaging
) else
match(git_url: $certificateRepoURL, username: $appleUsername,
type: "appstore",
app_identifier: $appBundleIdentifier
) end
4.1.1 Slack
4.1.2 Fabric/Crashlytics
You will need to install Crashlytics into your application to enable automated AdHoc distribution. Visit https://fabric.io/login and login. Follow the instructions found here: https://fabric.io/kits/ios/crashlytics/install For each scheme in the project, build and run on the simulator or device. Once the dashboards for each app have been created automatically in Fabric, find the com.compsoft.fastlane.dev dashboard and select “Beta” from the left hand menu. A new menu item will slide out below called “Mange Groups” click it. A new pop up will appear, tap the plus button to add a new group and name it <app name>- testers e.g. fastlane-testers. Invite all the members that are provisioned to the group. Update this line with the group name in the Fastfile:$crashlyticsTesterGroups = [“ourproject-testers"]
4.1.3 Target Name
The case on the target name is important, we have configured the schemes to use it in their name e.g. target name = fastlane, scheme = fastlane Staging, fastlane Testing, fastlane Production.4.1.4 iTC Team ID
$itcTeamId = "YourITCTeamID"If your Apple ID is a member of multiple ITC teams, you will also need to specify this ID, if you do not have it, delete this line and remove “team_id: $itcTeamId,” from pilot to give:
pilot(ipa: $ipaFilename, skip_submission: true, skip_waiting_for_build_processing: true )
To find this id, you will have to build the Staging configuration of the app from Jenkins after completing this guide, the build will fail as it does not know which team to upload to. However if you view the Console Log in Jenkins, there will be a list of Teams to choose from at the end of the file. Update the $itcTeamId with the correct ID and commit the code, rebuild and the build will be successfully uploaded to iTunes.
Finally...
Commit all your changes to your repository before proceeding.
5. iTunes Connect
To distribute the app via TestFlight and the App Store you will need to create App Store pages. Go to: https://itunesconnect.apple.com/ and login with your credentials, you will need to have been invited as an Admin to continue. Make sure the correct team is chosen from the list in the top left corner. Now click on “My Apps”, click the plus button on the top left and select “New App”. Click the “iOS” check box, Type in the name of your app as it will appear on the app store. Set the language and select the production Bundle ID from the list. com.compsoft.fastlane. enter a SKU and click create. Repeat the above steps and create another app for the Staging, Postfix the App name with “Staging” to differentiate it. The next step is to add test flight users, this prevents the need to submit the app for beta testing approval, add members to the ITC team.6. Jenkins Setup
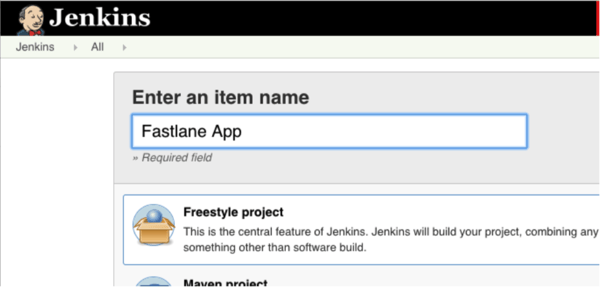
Go to: https://build.yourcompany.co.uk/ and login with your credentials. once logged in click “New Item” from the menu on the left, on the next page, type the name of your project and choose “Freestyle project” click ok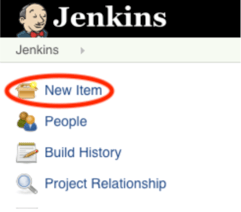
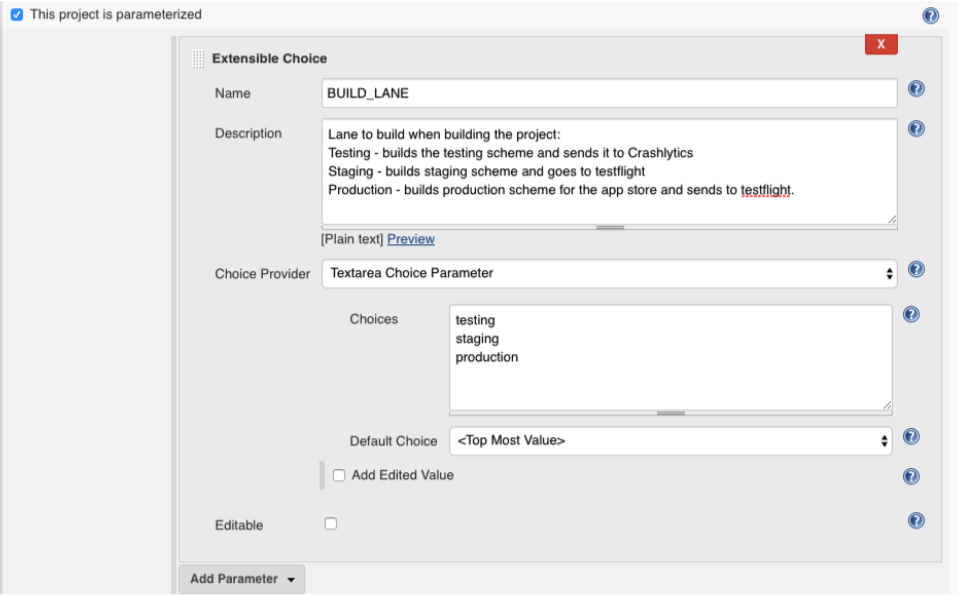
Production - builds production scheme for the app store and sends to testflight.”
in the choices box type the following with a new line after each choice: Note lowercase only.
Next find the “Restrict where this project can be run” and check the box. Enter: “build-mac”
Scroll down to “Source Code Management” and select the “Git” radio button.
Enter “https://bitbucket.org/yourcompany/fastlane” in the “Repository URL” field. Replace fastlane with the path to your project’s repository.
Click on the “Credentials” drop down and select “youremail@atyourcompany.com”
In the branch specifier field, change this to “*/development” or which ever branch you with to automate.
Now find the “Additional Behaviours” section and click Add, select “Wipe out repository and force clone”.
Scroll down to “Build Environment”and click on the check box for “Delete workspace before build starts”Click the check box for: “Color ANSI Console Output” and select xterm from the drop down list. Click the check box for: Inject environment variables to the build process
in the “Properties Content” field enter the following:
JENKINS_URL=10.0.10.50
HOME=/Users/builduser
LANG=en_US.UTF-8
LOGNAME=builduser PATH=/Users/builduser/.rbenv/shims:/Users/builduser/.rbenv/shims:/usr/bin:/bin:/usr/sbin:/sbin:/ usr/local/bin:
SHELL=/bin/bash
USER=builduser DEVELOPER_DIR=“/Applications/Xcode9.2.app"
Without that the build script will not work.
Next click the checkbox for “Inject passwords to the build as environment variables” and add 3 fields.
In the first type: “FASTLANE_PASSWORD” and set the password to the Apple ID’s password.
In the second type: “MATCH_PASSWORD” this is the secure password that you used in the Match section of this guide.
In the third type: “FL_UNLOCK_KEYCHAIN_PASSWORD” this is the build machine’s user password, you should know it...
Finally, scroll down to “Build” and click “Add build step” select “Execute shell”. In here type the following:
#!/bin/sh
fastlane $BUILD_LANE
Remember the extensible choice parameter from earlier? This is where the parameter is used. Save this configuration.
7. BUILD! BUILD! BUILD!
You are now ready to build for Testflight and Crashlytics!
Go to the dashboard for your project in Jenkins: https://build.yourcompany.co.uk/job/
Fastlane%20App/
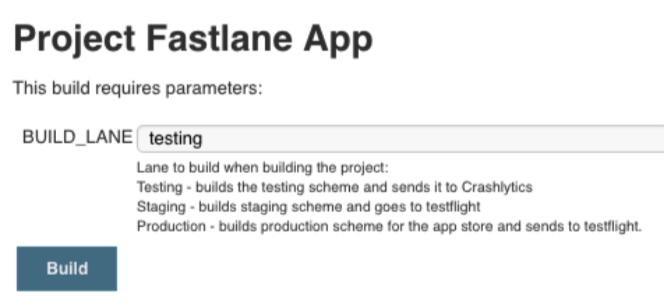
Click “Build with Parameters” from the lefthand menu.
![]()
We will need to test each configuration builds correctly. Start by clicking Build on this screen
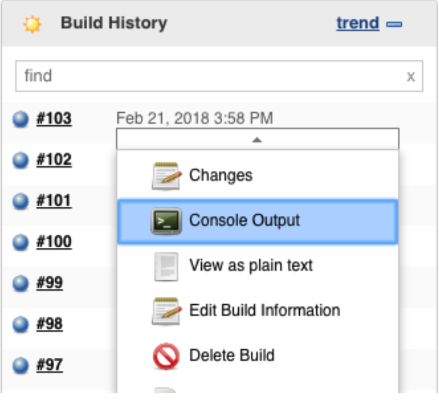
Wait for it to start building. Keep an eye on the build progress by viewing the build’s console log. To do this, click on the little arrow next to the active build in the menu and select “Console Log
<key>ITSAppUsesNonExemptEncryption</key> <false/>
Phew - well done if you have managed to get this far. Now sit back watch the continuous integration happen!
Got a project? Let's work together
Compsoft is a remote working company except for Thursdays when we work together from the Alton Maltings in Alton, Hampshire (UK). Our registered address is detailed below. We'd be delighted to have either a virtual chat with you or to make arrangements to meet in person.